Authorization
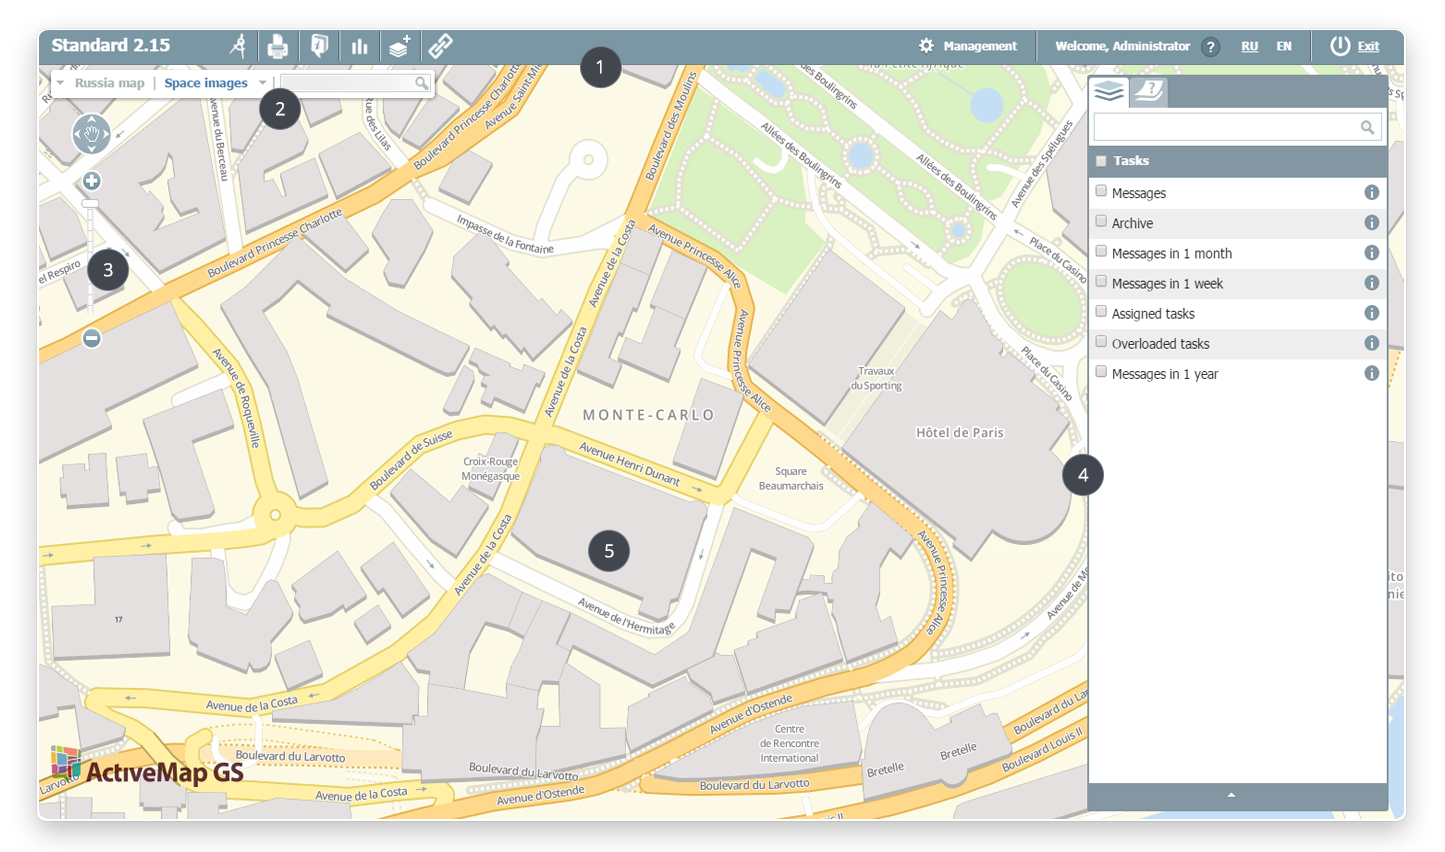
The Program primary window consists of the following control components:
1. Toolbar.
2. Blend control bar.
3. Map operation tool.
4. Layer control bar.
5. Map.
1. Enter your Geoportal system address in an address bar of an Internet browser.
2. Click "Enter" that is located in the right part of a control bar.
3. Enter the login and the password received when the Geoportal system was rented in the opened authorization window.
4. Click "Save password" to save the data on the computer.
5. Click "Enter".
|
|
Readme Geoportal system authorization procedure is not obligatory. However, users without the user account will have functionality limitations with system operation. |
|---|
Ruler tool

|
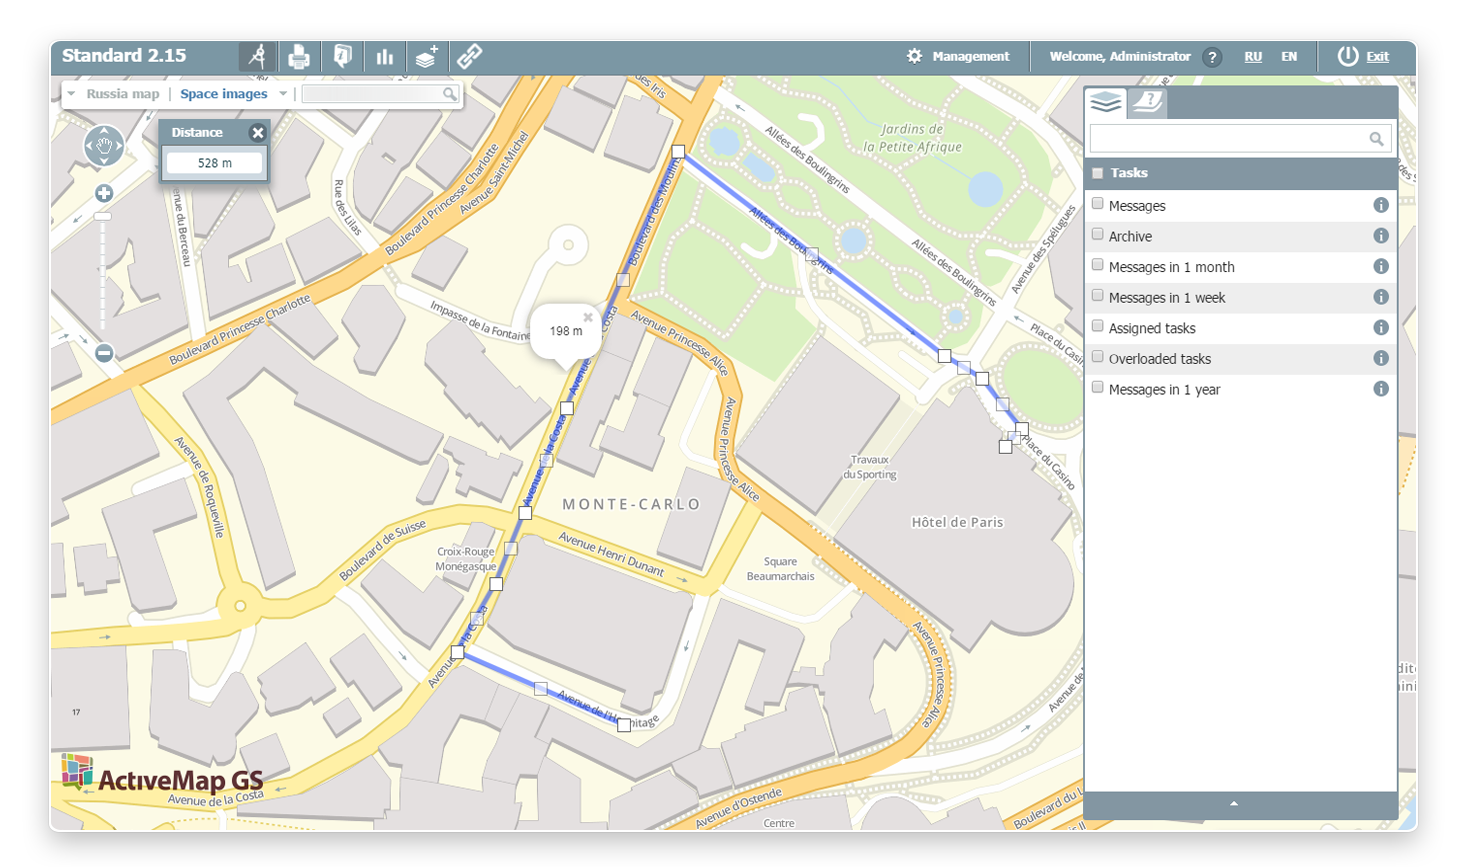
The distance measurement tool allows to find out the distance between points on the map. To use the given element click "Measure the distance" on the toolbar. |
|---|
To designate the route starting point transfer the appeared mouse cursor on the map and press the left mouse button. To designate the next route point move the mouse cursor on an interested area and again press the left mouse button. Mark all the following points in the same manner.
The distance to each following point will be added to the previous index and displayed in the left upper page corner in a separate form named "Distance". Besides, the user can regulate the distance between points by himself: the more intermediate points will be put down, the more precise the route and its distance will be.
Printing
|
|
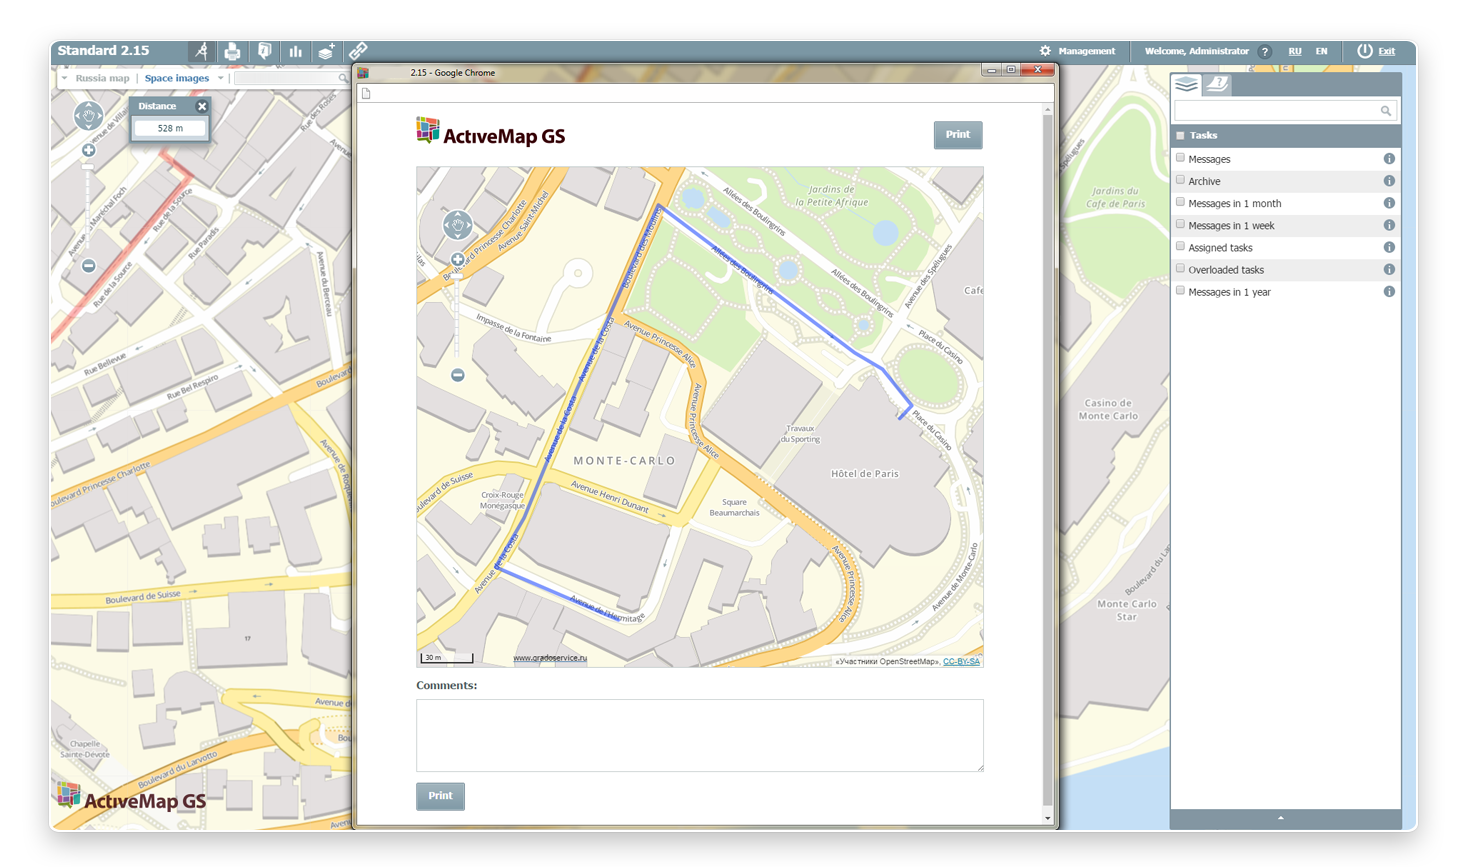
To print the base map click "Map printing" on the toolbar. |
|---|
Сlicking this button opens the new window, where the user can select necessary scale and map position. The field for entering the comment that is further displayed on the printing version is located under the map.
If "Measure distance" tool on the map has been switched on when choosing the Printing option, the laid route line will remain in the printing version as well.
List of objects of area

|
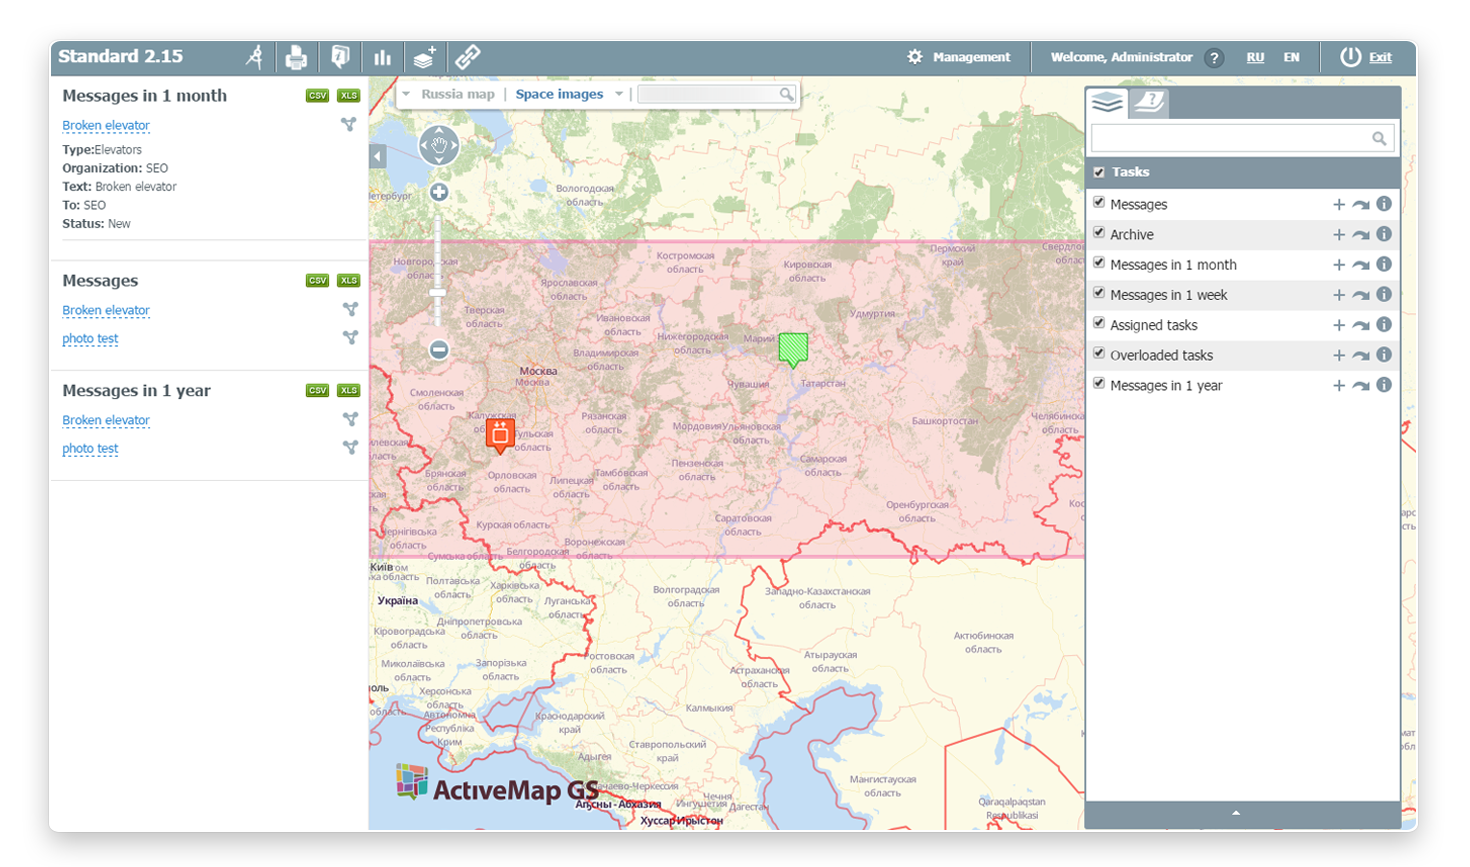
The List of area objects button gives the detailed information about selected area objects. |
|---|
To get the object list switch on necessary layers on a layer control bar by putting a tick ✔ to the left of their names. After these layers appear on the map, click "List of objects of area" and highlight an interested section on a selected area by pressing the left mouse button.
Highlighting a certain area on the map opens the window with the list of objects located on the selected section in the left side of a page. To get information about the certain object click its name in the given list.
All data on layers can be downloaded in xls and csv formats. To do this click XLS or CSV buttons located over the object list. When clicking one of buttons, links to download data on a certain layer will appear in the upper part of a window.
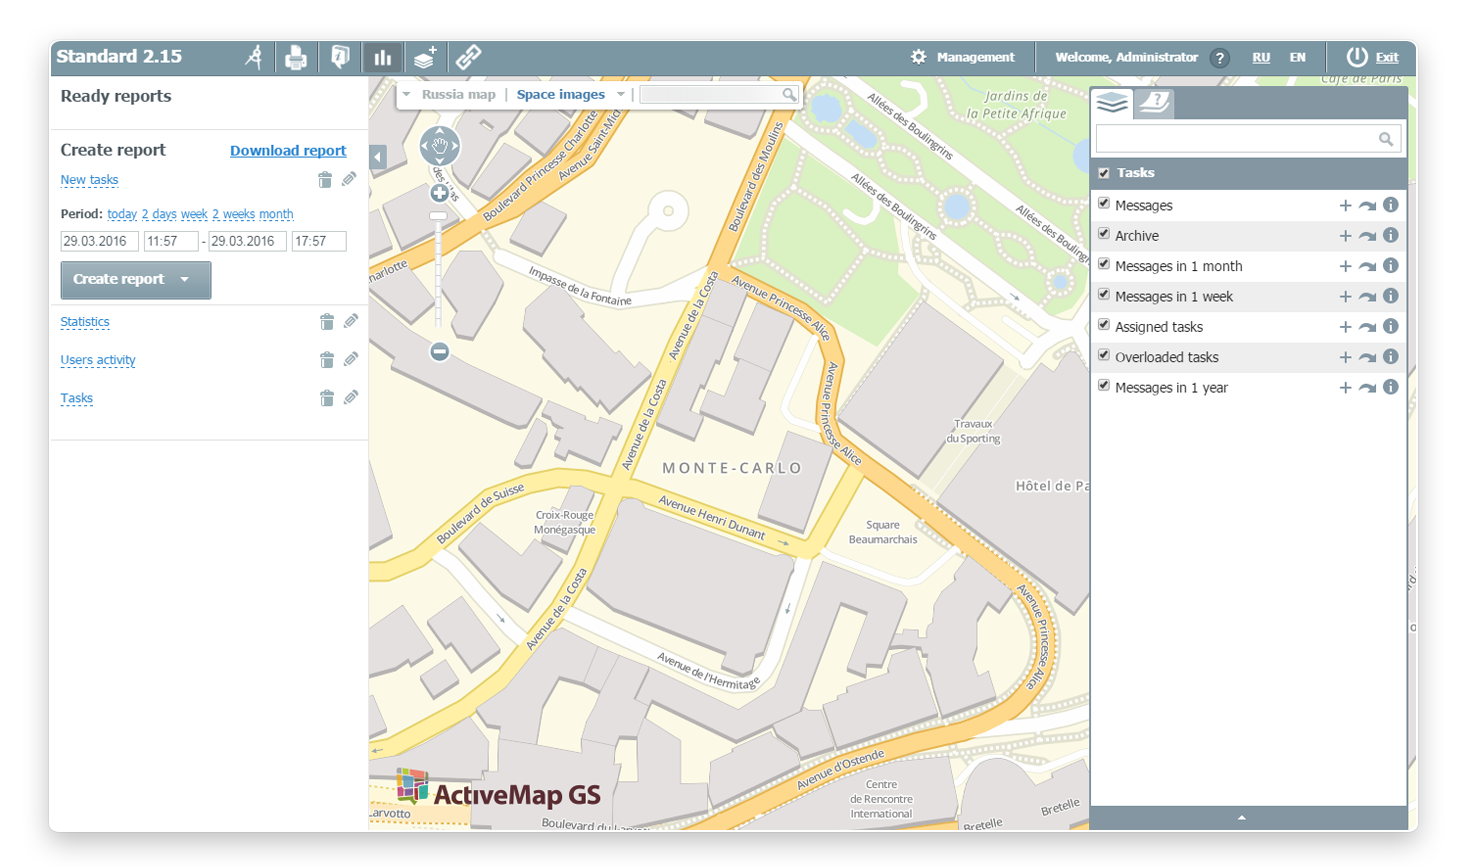
Reports

|
The Reports button is necessary for operation with system reports. Clicking this button opens the window in the left part of a page where the user can see prepared reports, create new ones, as well as edit, delete or download already existing ones. |
|---|
JReportInCache creation
To generate the report click "Reports" on a toolbar and select one of the reports offered in the list.
When clicking the report title, the parameter list with possibility to edit names is now available to the user as well as the button called "Create the report".
|
|
Readme The parameter list is unfolded only if these parameters are provided by the selected report. |
|---|
When clicking "Create the report", the format choice for saving the document is given to the user:
- XLS (Excel)
- DOC (Word 2007)
- RTF.
After the user has selected a certain report format the finished document gets to the Ready reports section.
JReportInCache downloading
To download the prepared report in the system click "Download the report" located over the general report list. Clicking this button opens the new window, where the user can select an interested document in jrxml format. After file downloading enter the report name and its parameters (if available).
JReportInCache editing
To change the report click the object editing button
 located to the right of a report name. Clicking this button opens the window,
where the user can change the report name and its parameters (if available).
located to the right of a report name. Clicking this button opens the window,
where the user can change the report name and its parameters (if available).
JReportInCache deletion
To delete the report click the object deletion button  located to the right of a report name. After that the dialog box for selected report deletion acknowledgement opens in a browser window.
|
|
Readme The Reports tool is available only for authorized users. |
|---|
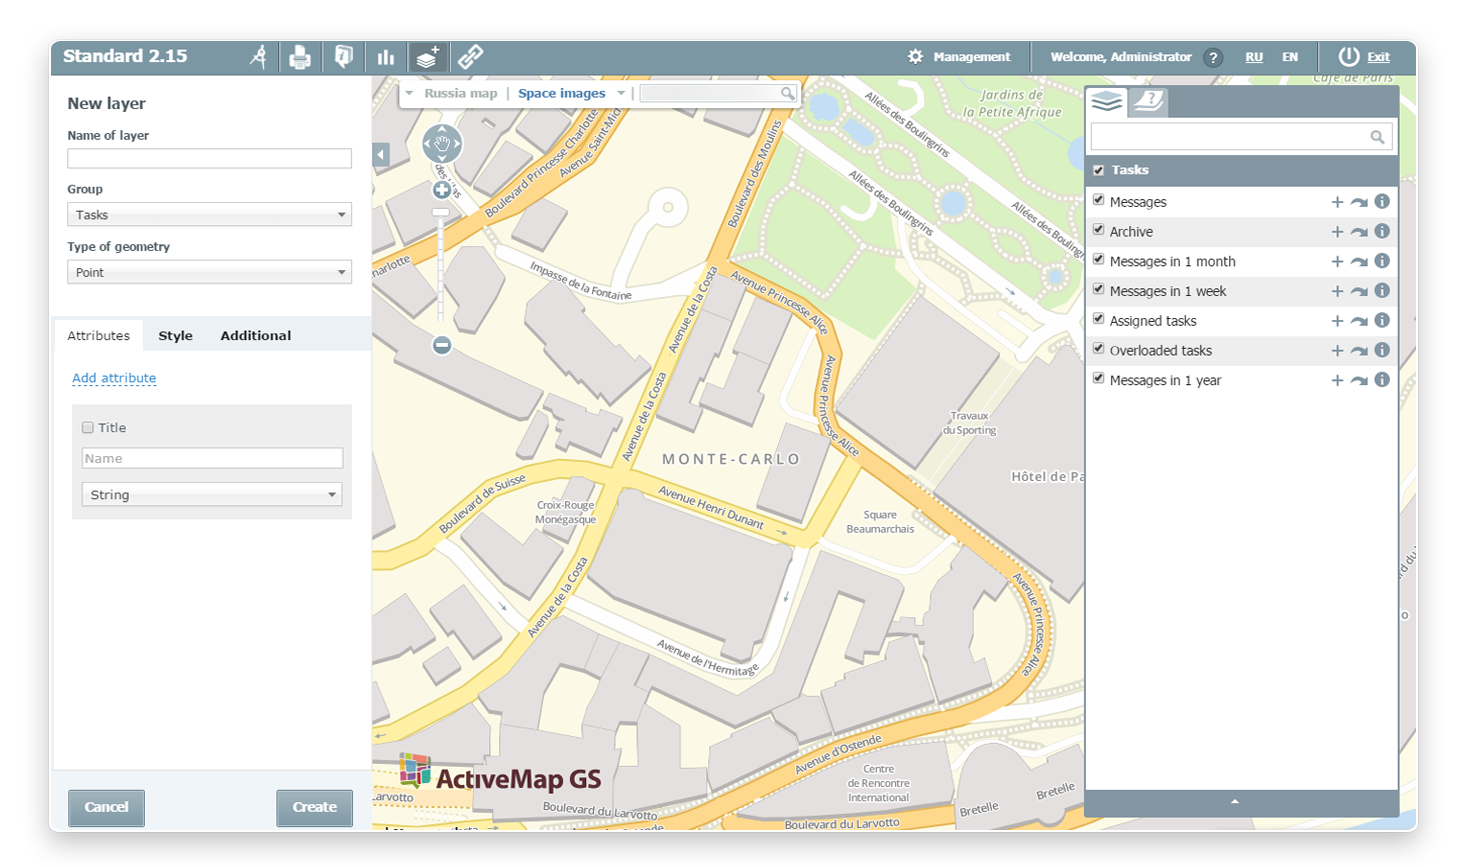
Layer creation

|
The "Create a layer" button is necessary for creation new layers in the system. |
|---|
Layer creation
Clicking "Create a layer" in the left side of a page opens the window, where the user can enter a layer name, select a group for layer location and select one of three geometry types.
Moreover, in a layer creation window the user can add new attributes (in case of going to the Attributes tab), select its display style (in case of going to the Style tab) and enter additional information in appropriate fields for entry (in case of going to the Additional information tab).
Attribute adding
When clicking "Add an attribute", a form with the following fields for entry appears in a layer creation window:
- title (the user should decide whether the given attribute will be the title when layer object information is displayed);
- name;
- attribute type (a string, an integer or a floating-point number).
To add a new attribute it is necessary to click "Add an attribute" once more and after that a new form with appropriate fields for entry will appear in a layer creation window.
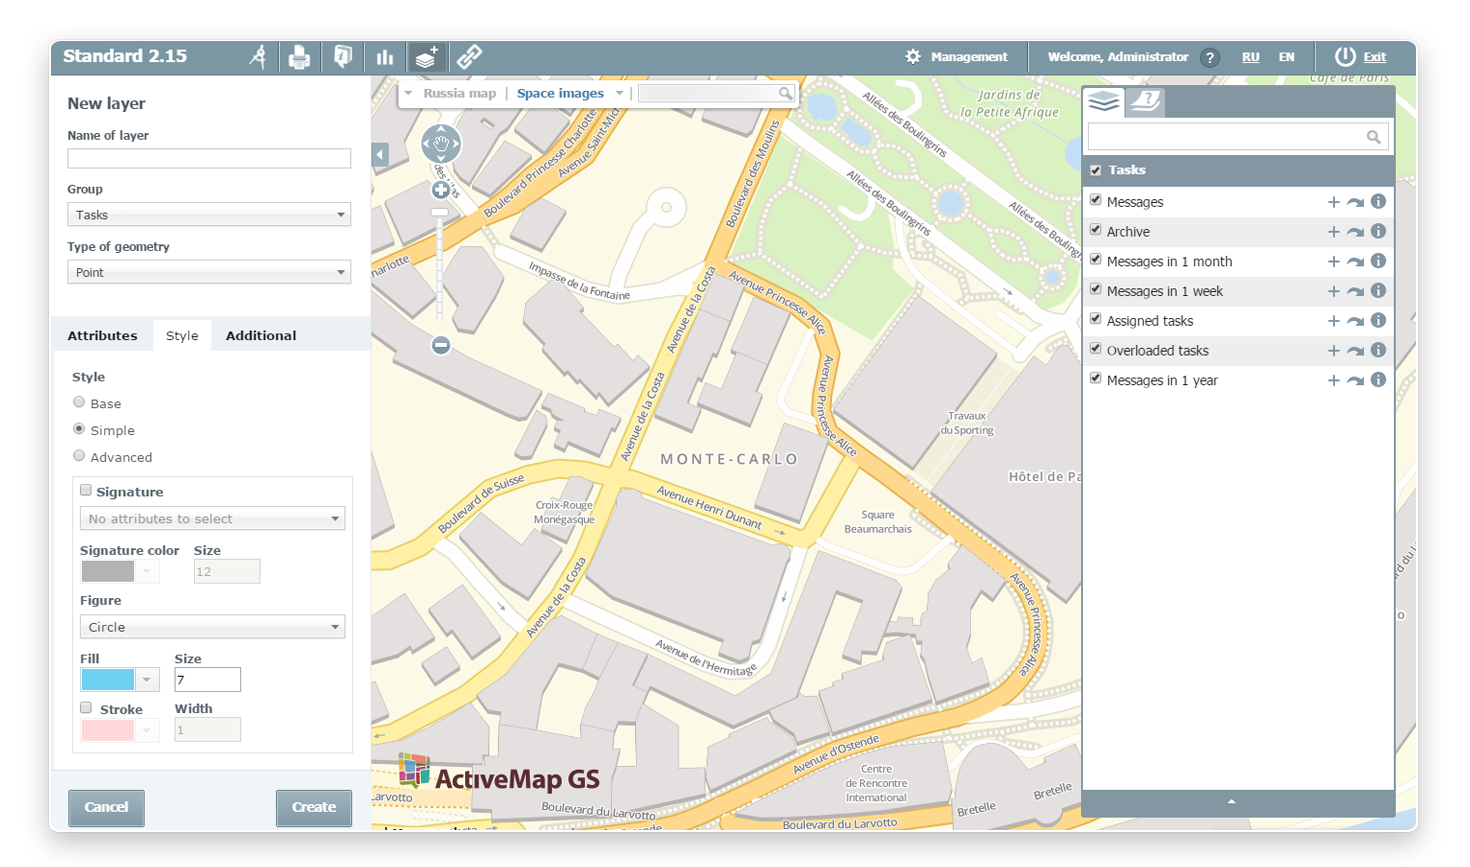
Layer object style choice
In a layer adding window on the Style tab the user can select one of the following styles of layer object display:
- basic style - style by default (a point, a line or a polygon);
- simple style - it allows to set the object form, signature color, filling and stroke;
- expanded style - style formation is applied by means of geocss language.
Geometry types
The Geometry type parameter is responsible for exterior view of objects on a map. The user can select one of three options:
- point,
- line,
- polygon.
Depending on the selected geometry type style settings are changed in a layer creation window.
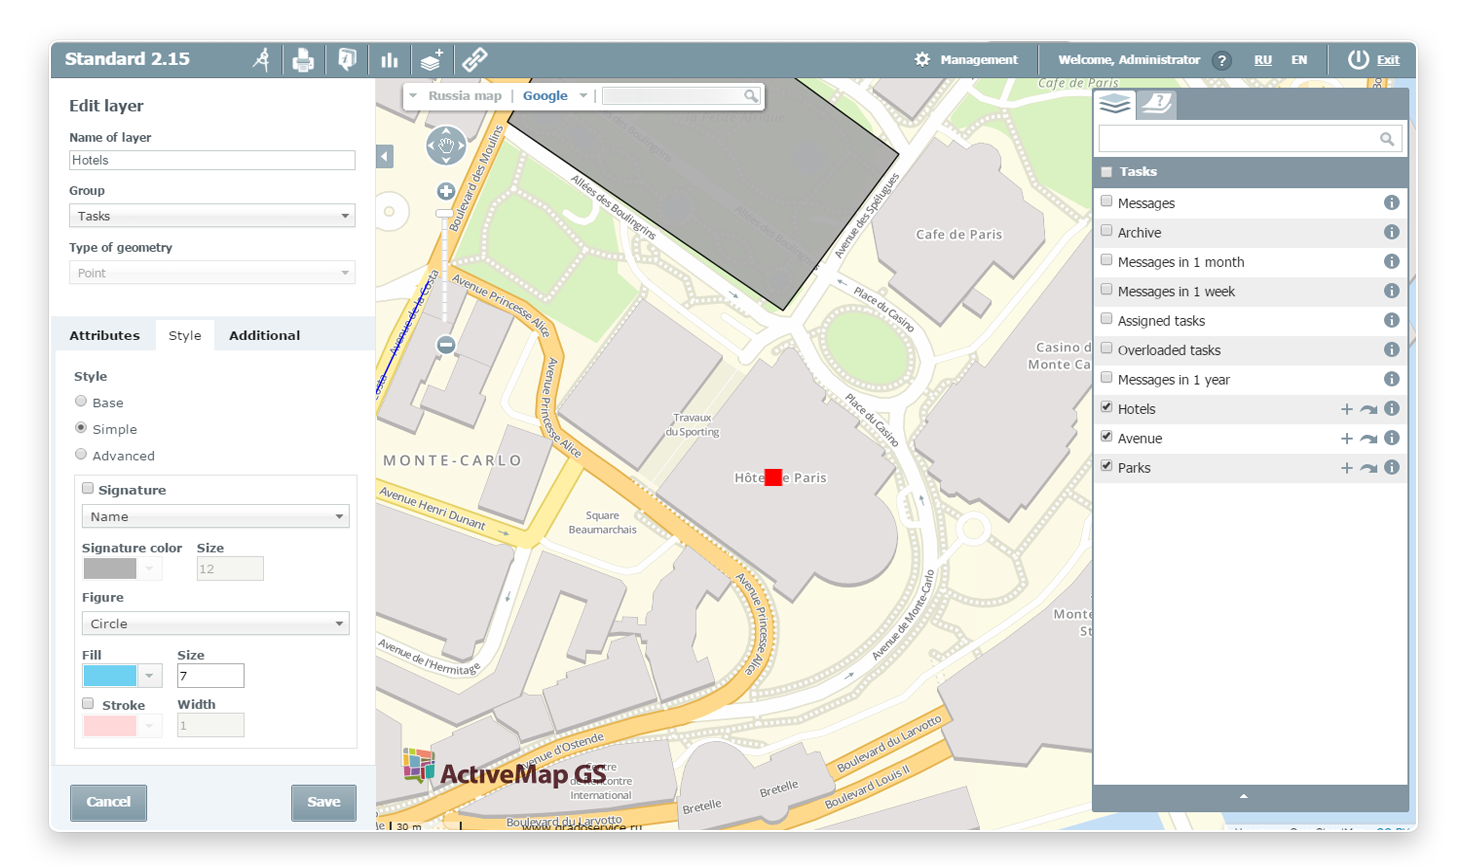
Geometry type: a point
If a point is selected as a geometry type and simple style is set to attributes, the user should define signature presence. For this purpose it is necessary to put a tick ✔ against an appropriate parameter.
Then the user should define an attribute that will be the signature, its color and size. The user can also set each attribute form (a circle, a triangle, a square) or select style with an icon. Moreover, to the discretion of the user filling color and size are selected, as well as figure stroke is made.
Geometry type: a line
If a line is selected as a geometry type and simple style is set to attributes, the user can select by himself filling color and size. To set signature and stroke color, it is necessary to select appropriate Signature and Stroke parameters.
Geometry type: a polygon
If a polygon is selected as a geometry type and simple style is set to attributes, the user not only can set signature and stroke colors and sizes, but also filling transparency.
When clicking "Create" the new layer is displayed on a layer control bar in the group selected by the user during layer creation.
Additional fields
In case of going to the Additional information tab the user can enter additional information on a layer into appropriate fields for entry. After adding a layer in the system additional information will be displayed in a layer information window in the form of a separate list.
Click "Create" to add a new layer in the system. Click "Cancel" to cancel layer creation.
Permanent link

|
The Permanent link tool is necessary for URL creation by clicking which the user can go to the system, as well as for generation of the HTML code that can be added to the web site. |
|---|
When choosing the given tool the window appears in the left side of a page with URL link that saves the map zoom and all layers marked by the user. For convenience it is possible to use link shortening function by selecting appropriate parameter «Get a short link».
When generating the HTML code the user can select a certain size of a map (small, medium, large, user), its width and height. Moreover, the user should decide whether the basic layer control components and map control components will be displayed when adding the code to the web site
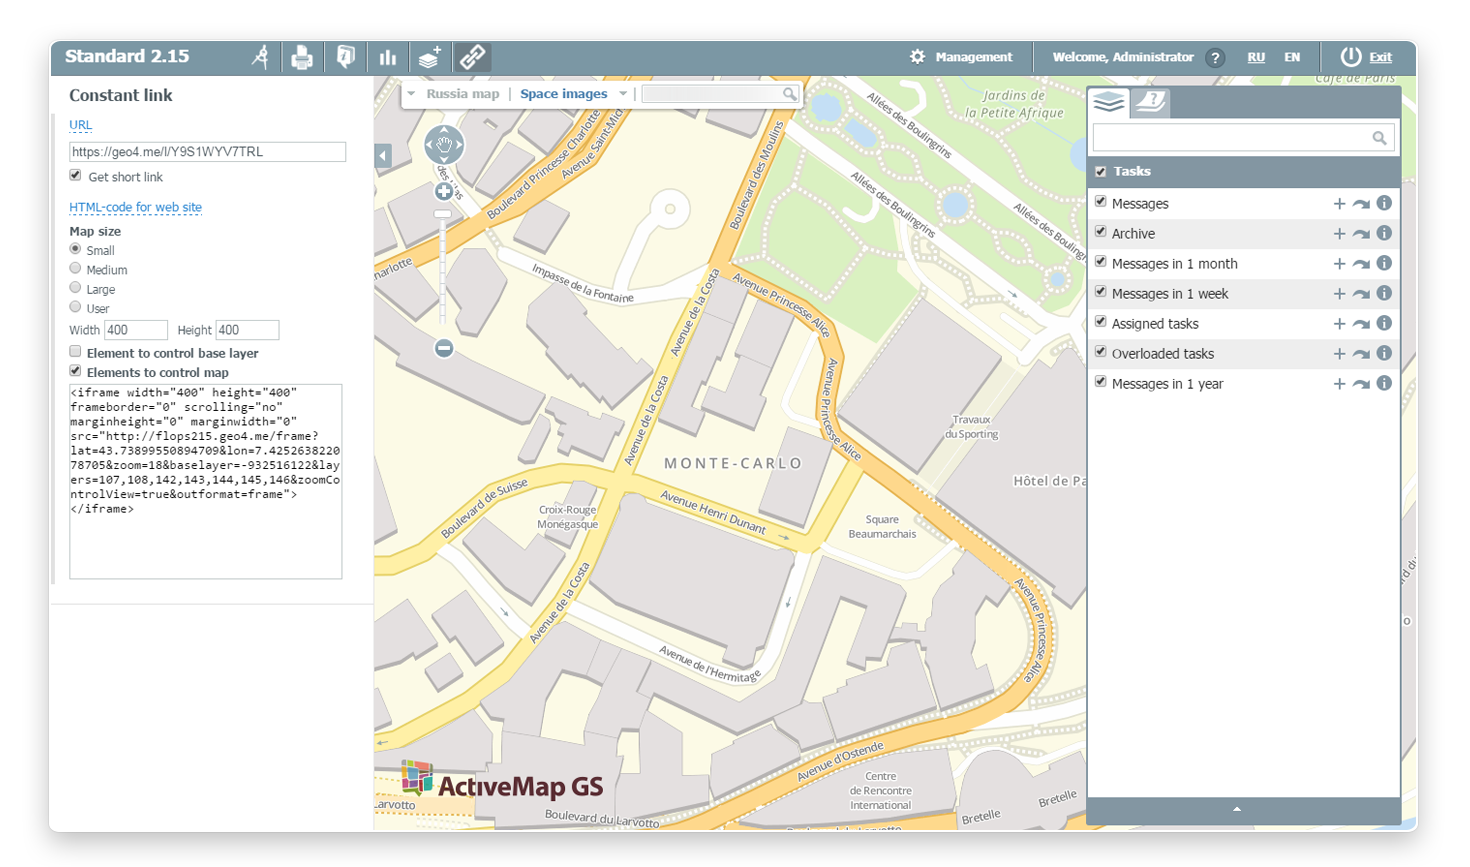
After adding the saved HTML code to the web site the map relocation tool will be available to the user as well as the possibility to change its scale. Furthermore, when adding the code, the layer object information obtaining function is remained.
To find out the number of objects on a certain map point, it is necessary to press the left mouse button on interested location. When pressing the left mouse button on a total object number the list with detailed information about each object is opened in a window.
Map relocation
For map relocation use the relocation tool located in the left part of a system page. The necessary direction is set by pressing the
"to the left – to the right", "up – down" arrows. When choosing "Relocation on a map" all earlier selected components of a control bar are automatically closed.
Relocation on a map can also be made by means of the mouse. For this purpose place the mouse cursor on a certain map section, press the left mouse button and without releasing it move the pointer to the necessary direction.
To change a map scale it is possible to use a scroll wheel or "+" and "–" buttons of Relocation on a map tool.
Choice of a cartographic basis
There are two layer display methods in a blend control bar: maps and satellite images. If the user selects terrain view by means of a schematic map, passage to Russia maps, OpenStreetMaps, Yandex and Google can be made according to the system settings.
When selecting the Satellite images view mode the user can view the terrain in the form of space images using Google, Yandex, Russian Federal Space Agency or ScanEx data.
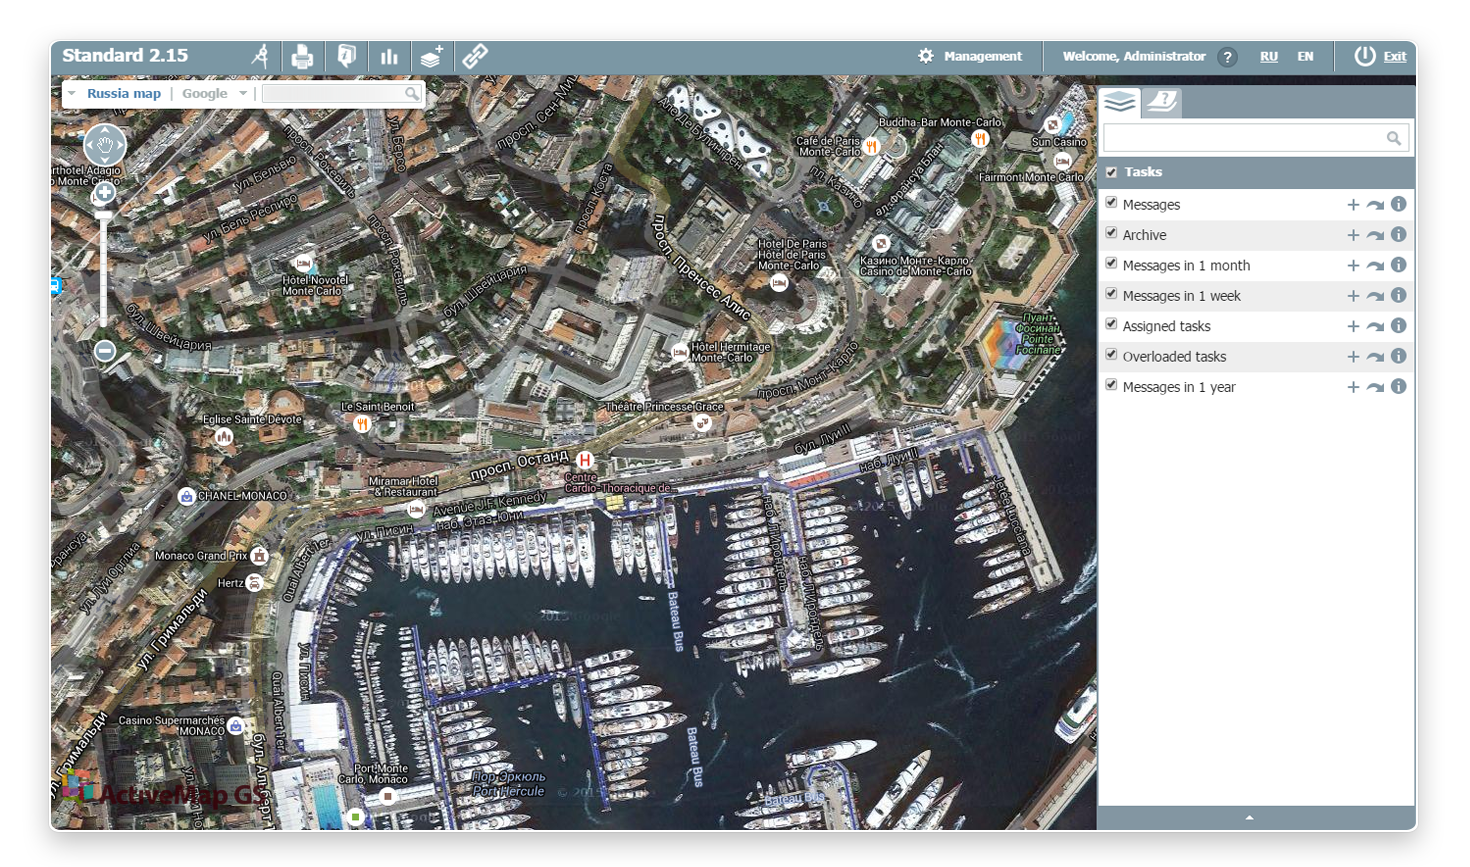
Search
Object search in the system is conducted by means of a search box located under the toolbar. To find an object on a map enter its name in the field for entry and click "Search" or press the Enter key on a keyboard.
After that the window with the found object appears in the left part of a page. When pressing the left mouse button on a line with a certain object the map is moved to its site and displays the object in the form of a mark.
Moreover, object search by on-layers is available to the user. For this purpose the user needs to apply to the layer control bar, tick ✔ interested layers, return to the search box and enter an object name. Then only objects related to on-layers will be shown in a window with search results.
Search function is also located on a layer control bar. To find a certain layer the user needs to enter a keyword into a search box.
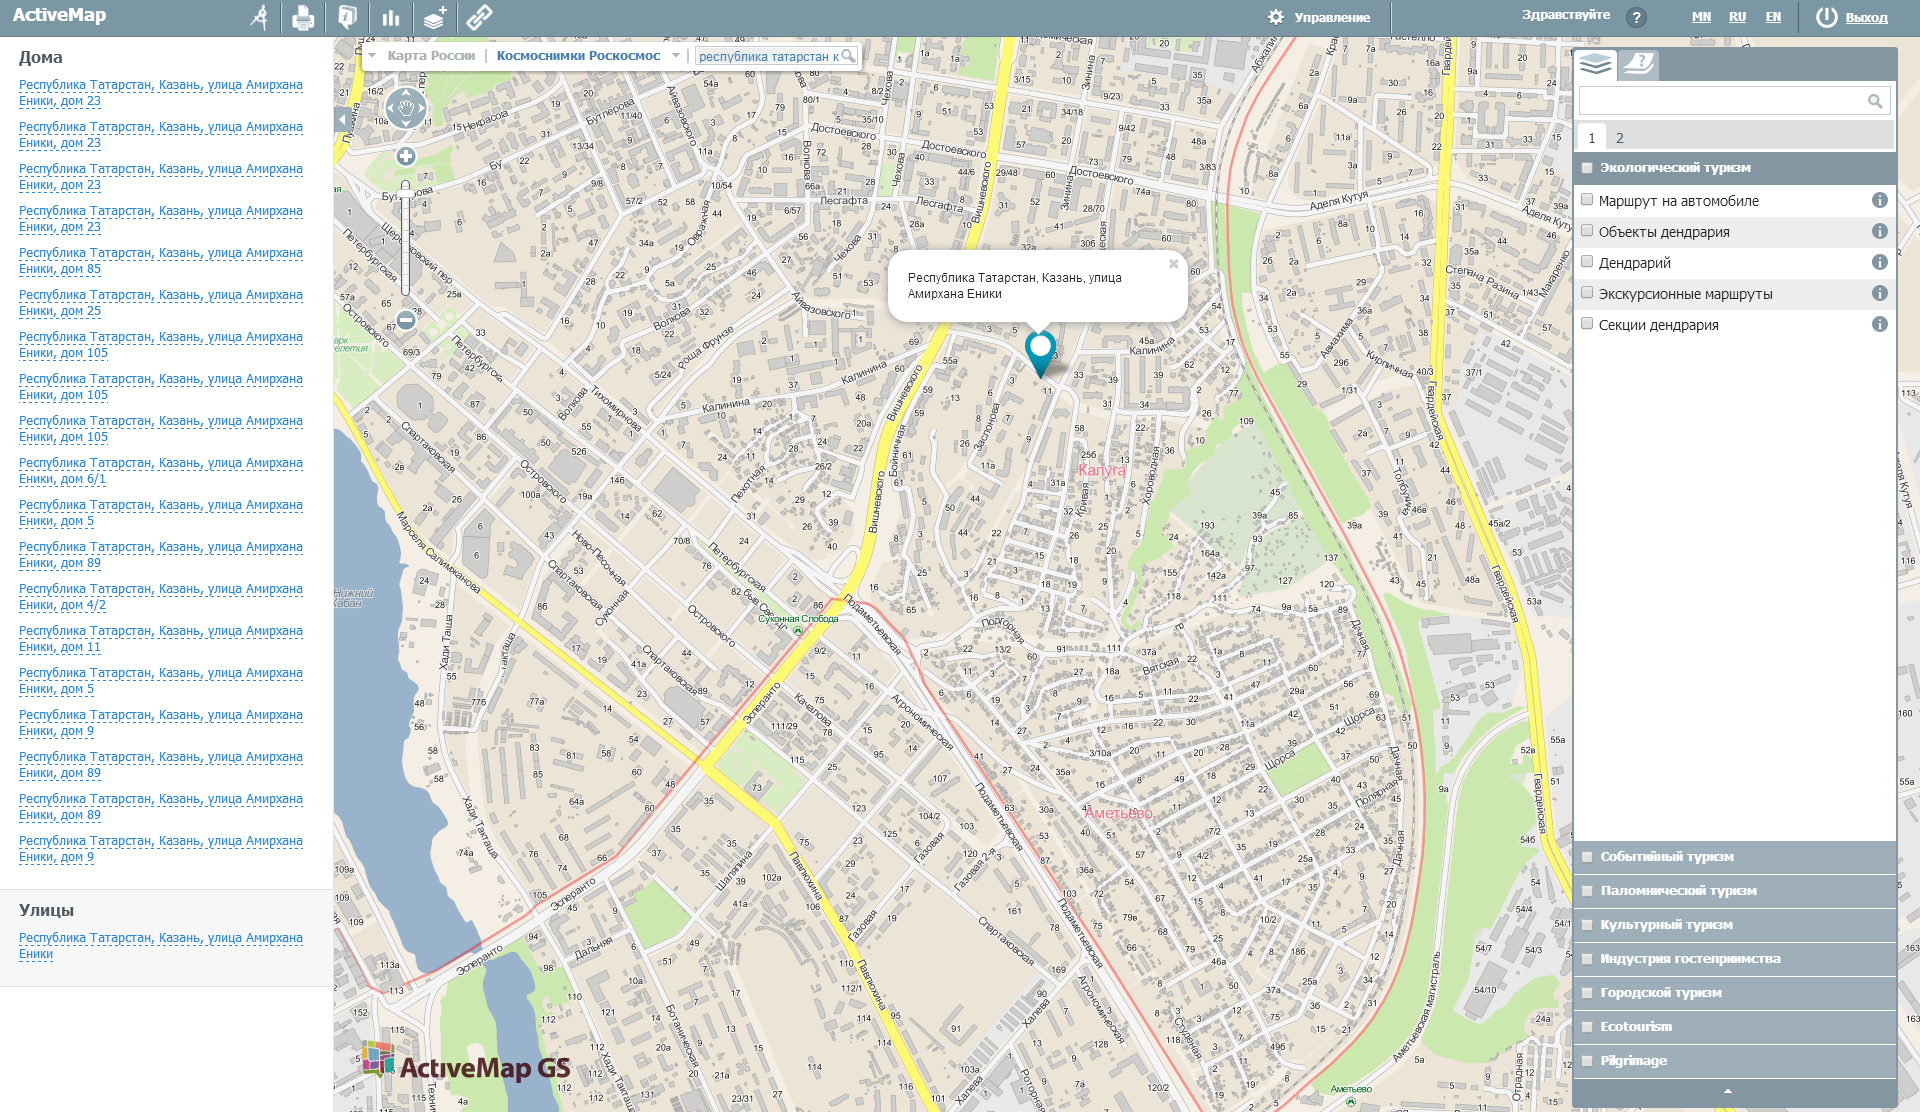
Layers

|
The Layers tab displays map layers available to the certain user. If the user is not authorized in the system, he may have limitations for operation with some layers. |
|---|
Search of interested objects, adding of photographs and files, and also new layer editing and creation is available to the authorized user in this tab.
To see layer objects on a map it is necessary to switch on a certain control bar layer by putting a tick ✔ to the left of its name. Besides, the user can display all layers of a group at once by putting a tick ✔ against its name.
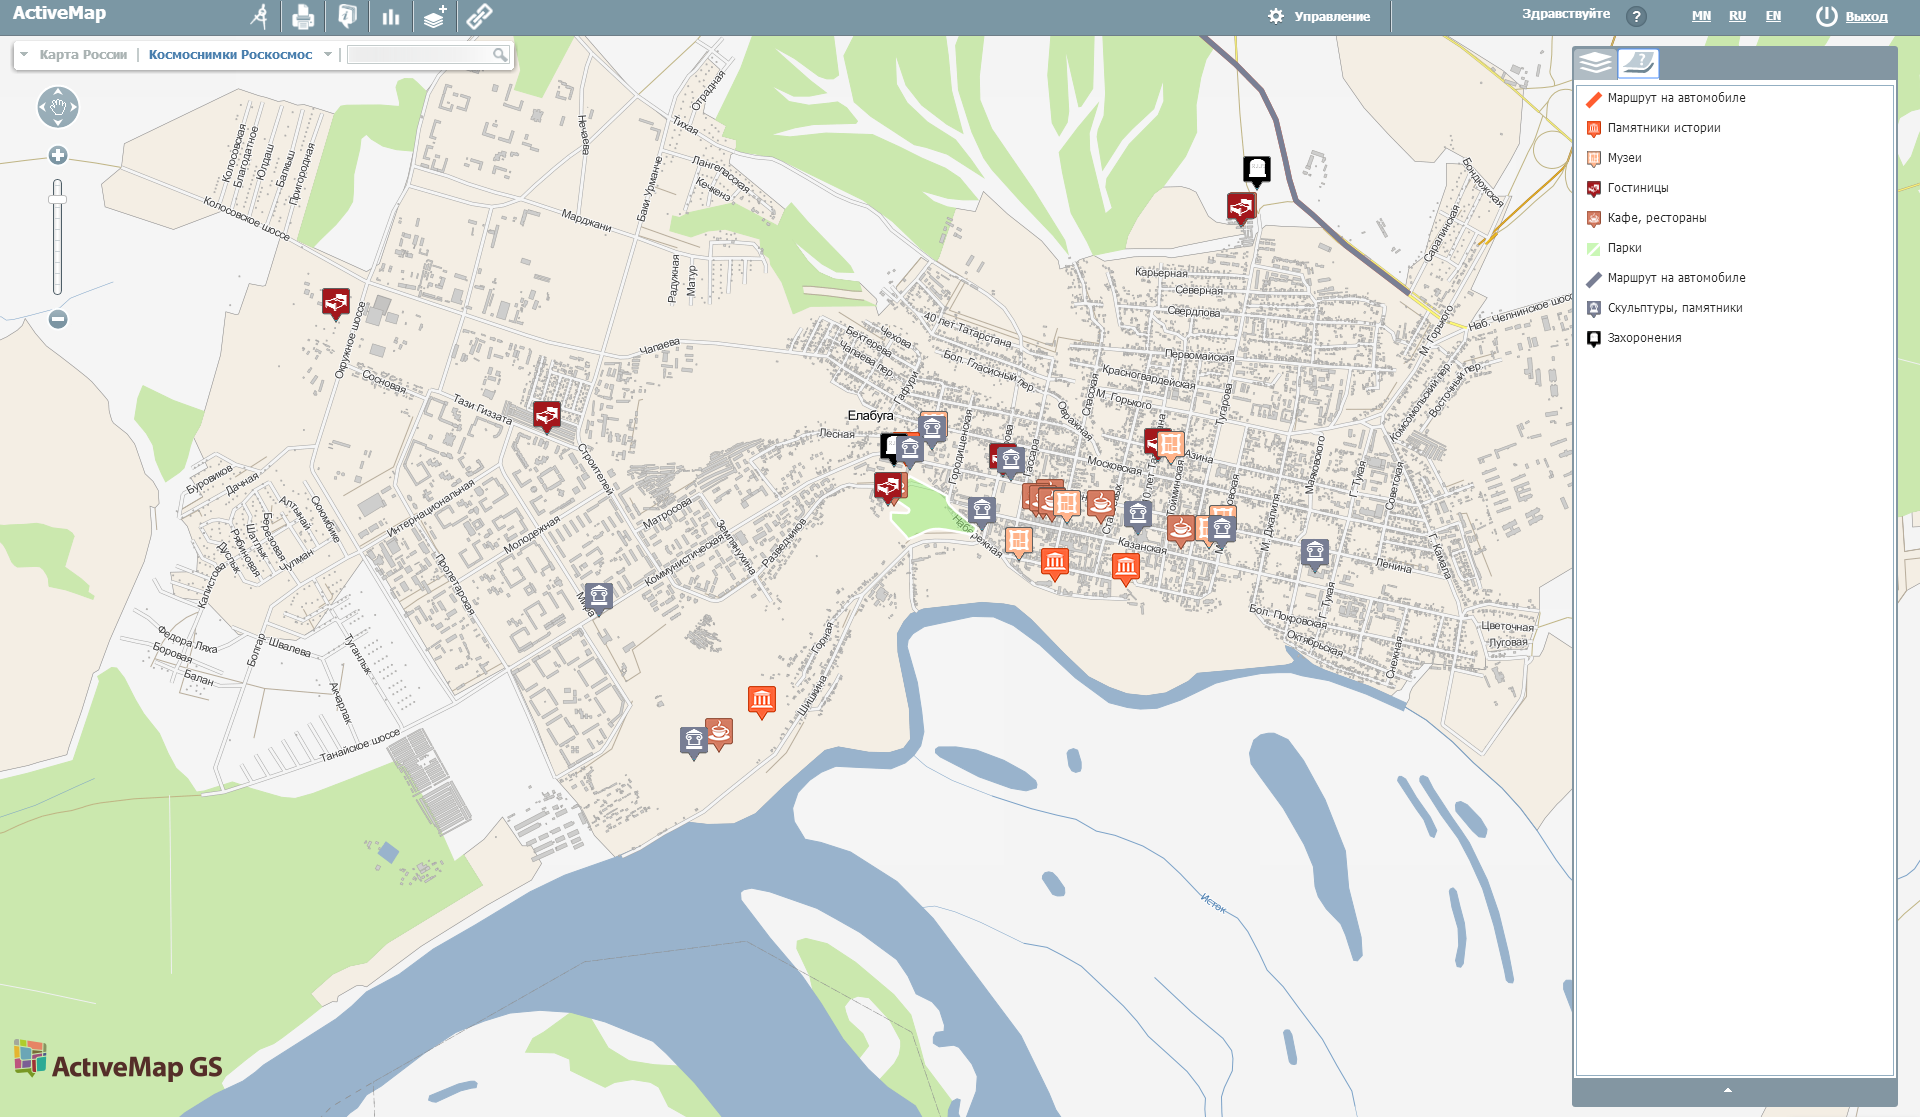
Legend
The Legend tab located on a layer control bar displays styles by means of which layers (selected on the Layers tab) are displayed on a map
Adding objects
When clicking "Add an object" ![]() ,
a pointer appears on the screen by means of which the user can place a new object on a selected layer.
After that the user needs to press the left mouse button, and a new object will appear in the certain place.
Added object appearance depends on a geometry type selected when a layer has been created (a point, a line or a polygon).
,
a pointer appears on the screen by means of which the user can place a new object on a selected layer.
After that the user needs to press the left mouse button, and a new object will appear in the certain place.
Added object appearance depends on a geometry type selected when a layer has been created (a point, a line or a polygon).
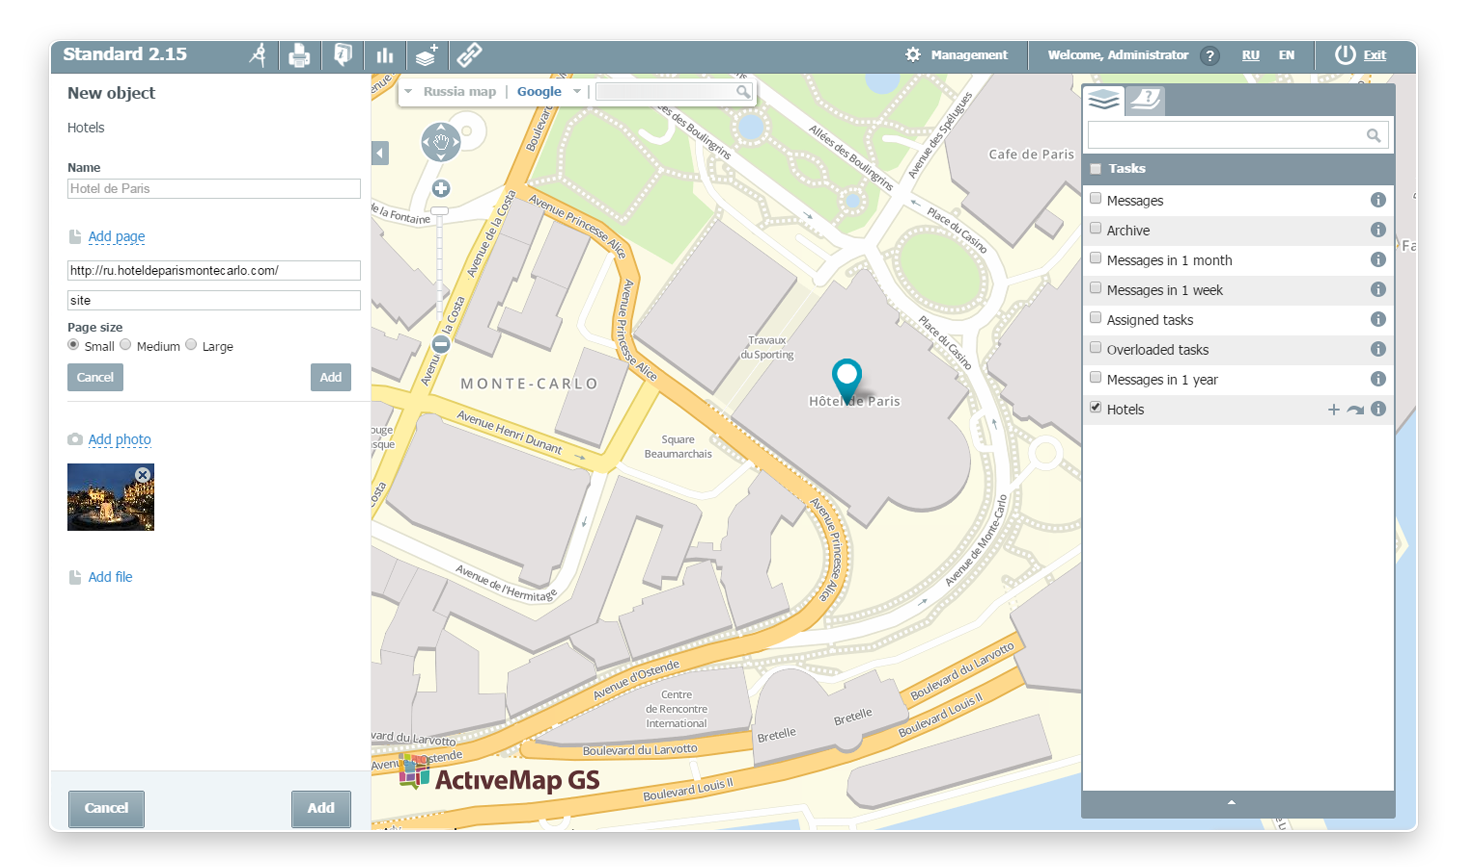
Add an object: a point
To add a certain object or a construction on a map click "Add an object", place the mouse cursor to a corresponding point on a map (where a new object should appear) and press the left mouse button.
After that a mark with a new object appears on a map, and an information window pops up in the left part of a page.
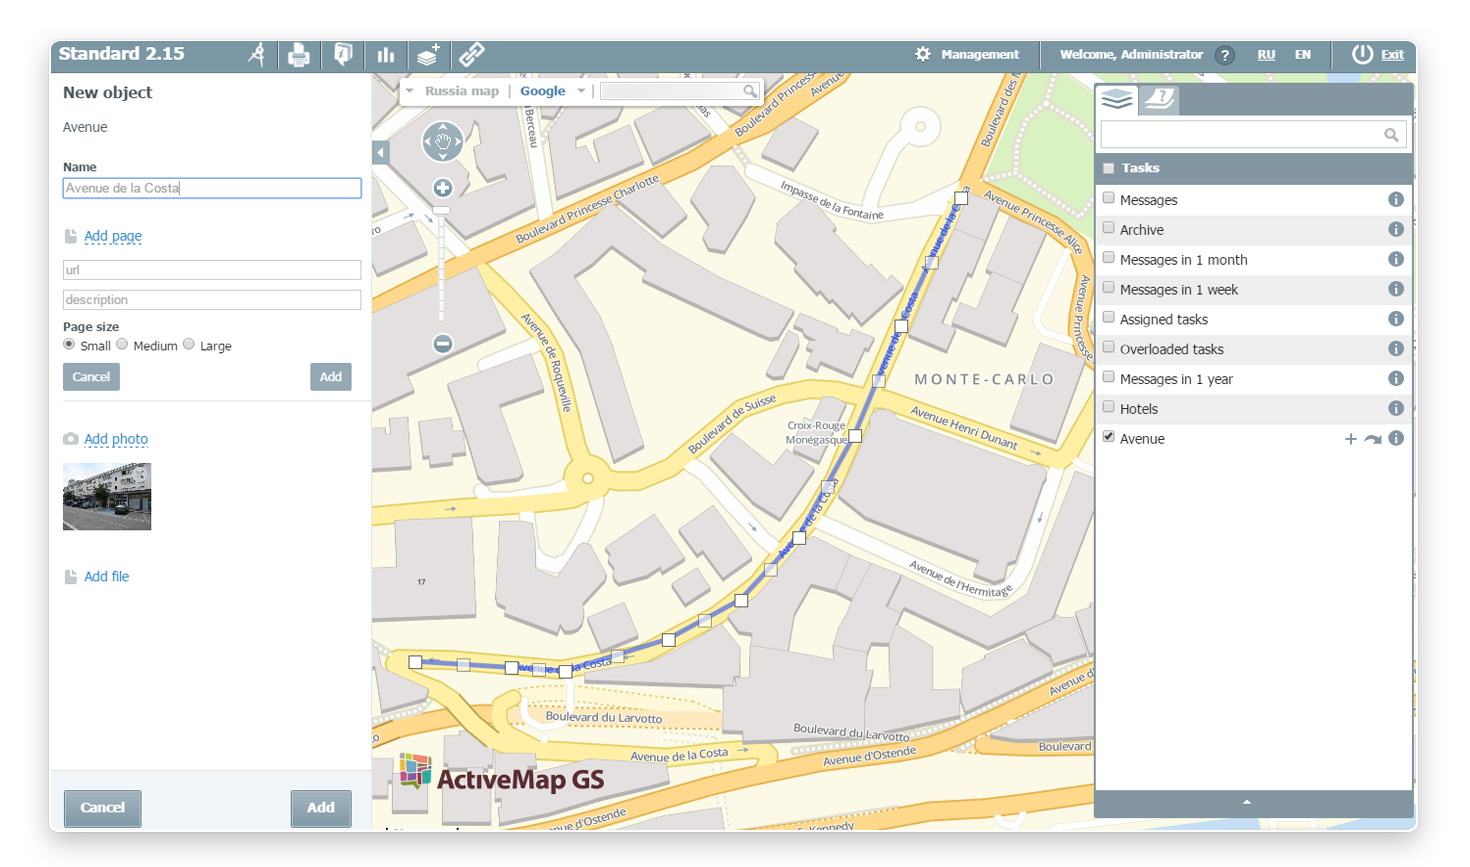
Add an object: a line
To lay out a route or a road on a map click "Add an object", place the mouse cursor to a certain point on the map and press the left mouse button. Then a white mark that designates the beginning of route creation appears on a map.
To determine the terminal point of a route it is necessary to transfer the mouse cursor to a certain point on the map and press the left mouse button. As a result, these two points on the map are connected in one line.
To get the most exact route the user needs to add intermediate points on the constructed line. For this purpose the user should press the left mouse button on a white intermediate mark and without releasing the mouse button transfer this mark to other place. As soon as the user releases the mouse button additional white marks that specify a desirable route appear on a map.
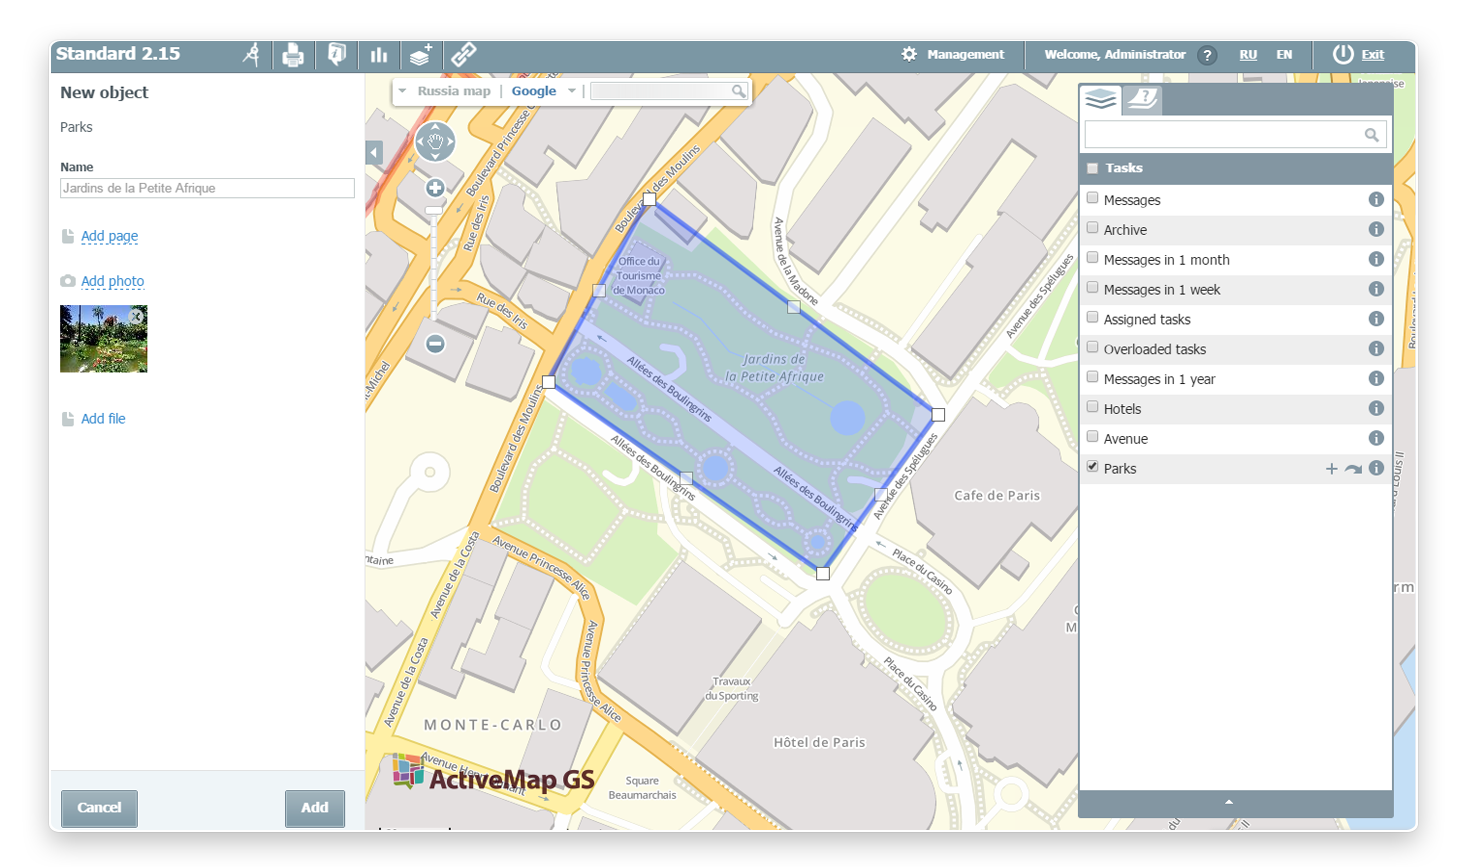
Add an object: a polygon
To highlight some area on a map click "Add an object", move the mouse cursor to a certain point on the map and press the left mouse button. After that a mark that designates the beginning of area creation appears on the map.
Then the user needs to select at least two new points on the map that the system could construct a polygon and highlight a desirable area. Additional points are created in the same way: the mouse cursor is placed to a certain place on the map and the left mouse button is pressed connecting two adjacent points in a line
The following is available to the user in the opened window:
- layer attribute value indication (if available);
- URL link adding (link to an external resource, link description, as well as the size of a window in which the given resource will be shown);
- adding of photographs and files.
Transfer to a layer
The Transfer to a layer button  allows to pass immediately to the selected layer on a map.
Information on a layer
Clicking "Information on a layer" ![]() (the button is located in a layer control bar)
opens a window in the left part of a page in which the following is available to the user:
(the button is located in a layer control bar)
opens a window in the left part of a page in which the following is available to the user:
- layer transparency regulation on a map;
- map comparing before and after layer stacking by means of a Swipe tool;
- additional layer information review (information is available, if all corresponding fields have been filled during layer creating or editing);
- switching between Legend, Filters and Information tabs.
The Legend tab indicates style, in which layer objects are displayed on a map. The Filters tab allows to restrict a layer object set that will be shown on a map. The Information tab (not always obligatory) contains additional data on a particular layer.
To use Filter function it is necessary to fill in attribute values in conformity with which filtration will be carried out. Here the user can also apply the geometrical filter according to which only the objects within the given area will be displayed on a map.
Moreover, the entire list of layer objects with their attributes can be saved in csv and xls formats. For this purpose it is necessary to click the CSV or XLS buttons accordingly.
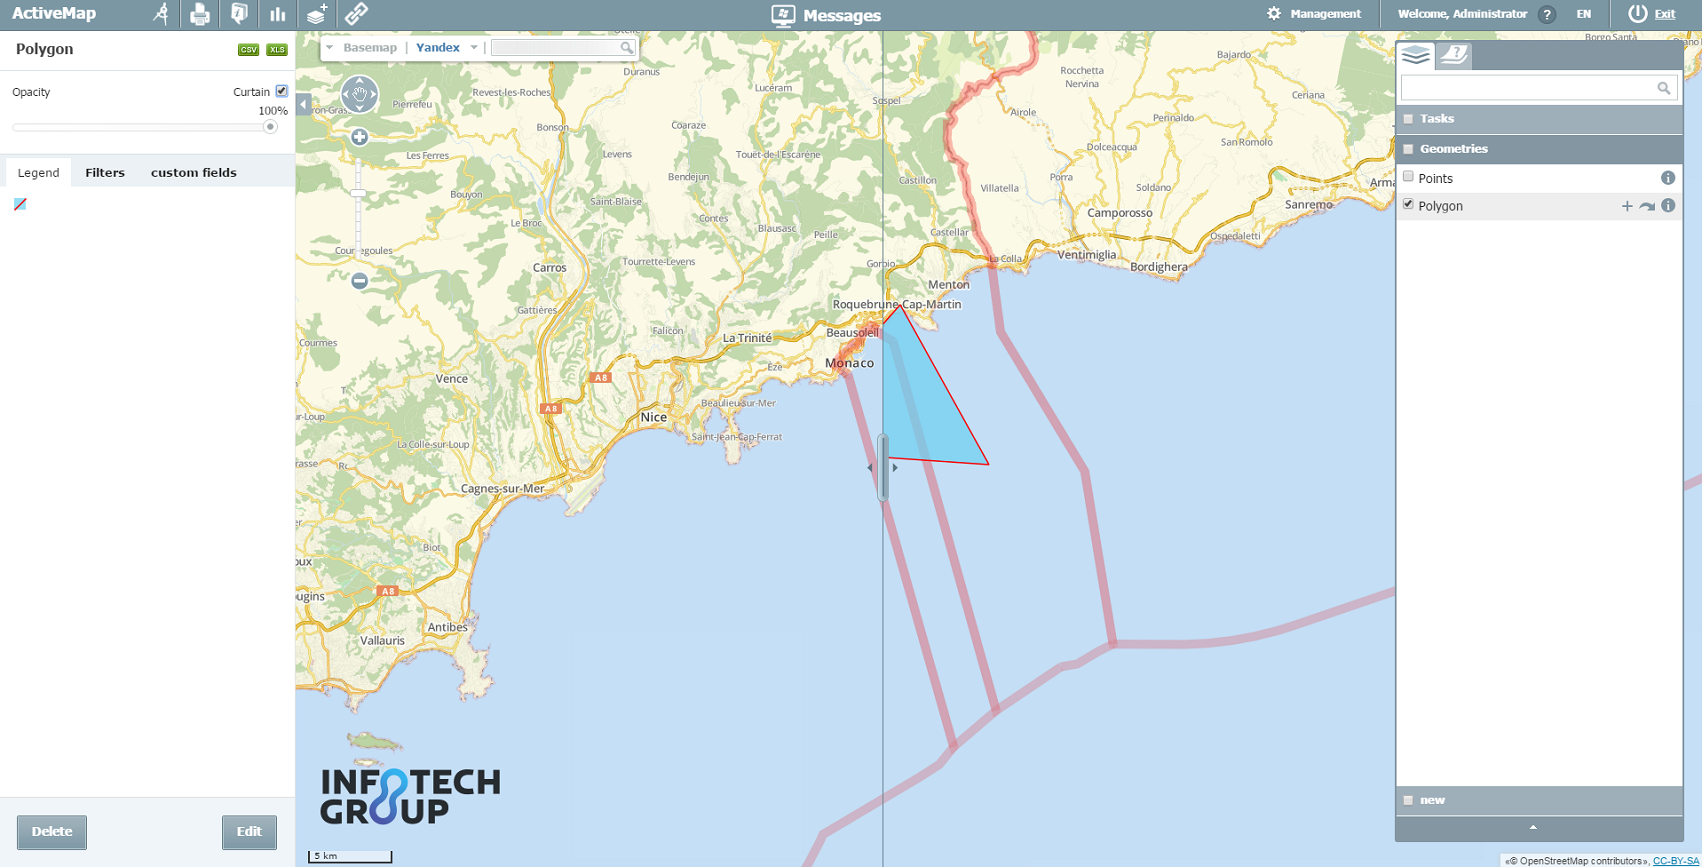
Swipe
To compare the map state before and after layer stacking use the Swipe tool located under the layer name.
When clicking this button a slider appears on a map that can be moved to the left or to the right by means of the left mouse button. The layer disappears on the left side of a swipe line, and it remains invariable on the right side.
Transparency
Transparency tool allows to adjust transparency of a layer on a map. To change layer visibility it is necessary to move a Transparency parameter slider to the left or to the right. The lower is the mark in a scale, the lesser is layer visibility.
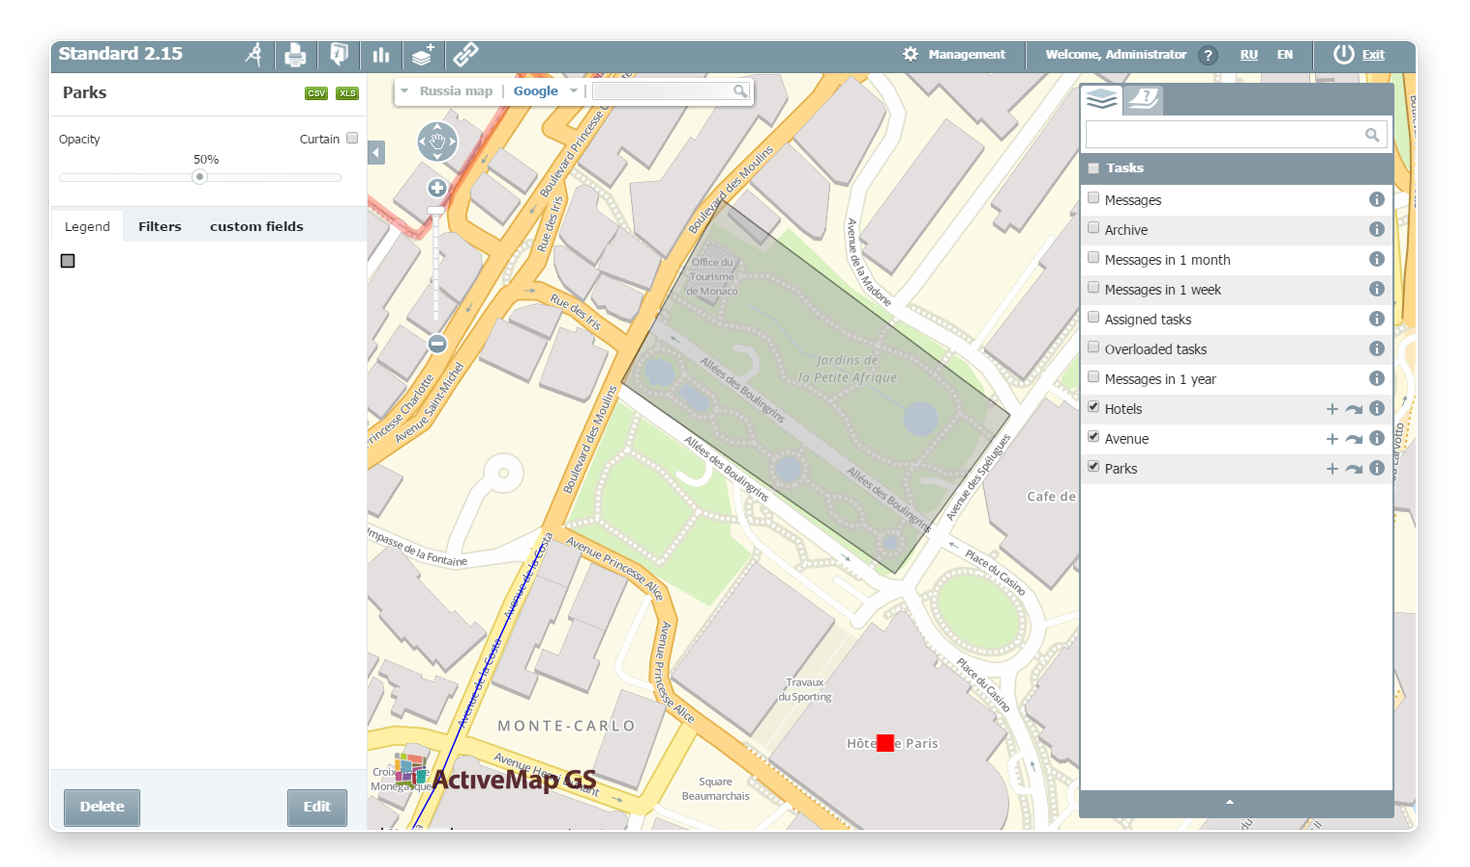
Layer transparency of 50 %.
Layer editing
To open a layer edit window click "Layer information" located on a layer control bar. Clicking this button opens a window with information about the selected layer in the left part of a page, as well as the Delete and Edit buttons.
To edit a layer click the Edit button. Clicking this button opens a window in the left part of a page, in which the user can change a layer name, transfer it to other group, add, change or delete attributes, as well as select style for each attribute (basic, simple, expanded). However not all fields are available for editing. For example, the user cannot change the geometry type and attribute type.
Click "Save" located in the lower part of a window to save the changes made. Click "Cancel" to cancel editing and return to the map.
Information about objects
If the user selects a certain layer on a map and presses on it with the left mouse button, the system will automatically display the objects within the specified place. In such a case the marker is placed in the given point, and brief information on the first object and total number of objects located in the point appear over the marker.
Clicking «More detailed and found» in the left part of a page opens the window with the list of all found objects. When clicking the object title, the user can see full information on the object, including attached photographs, files and links.
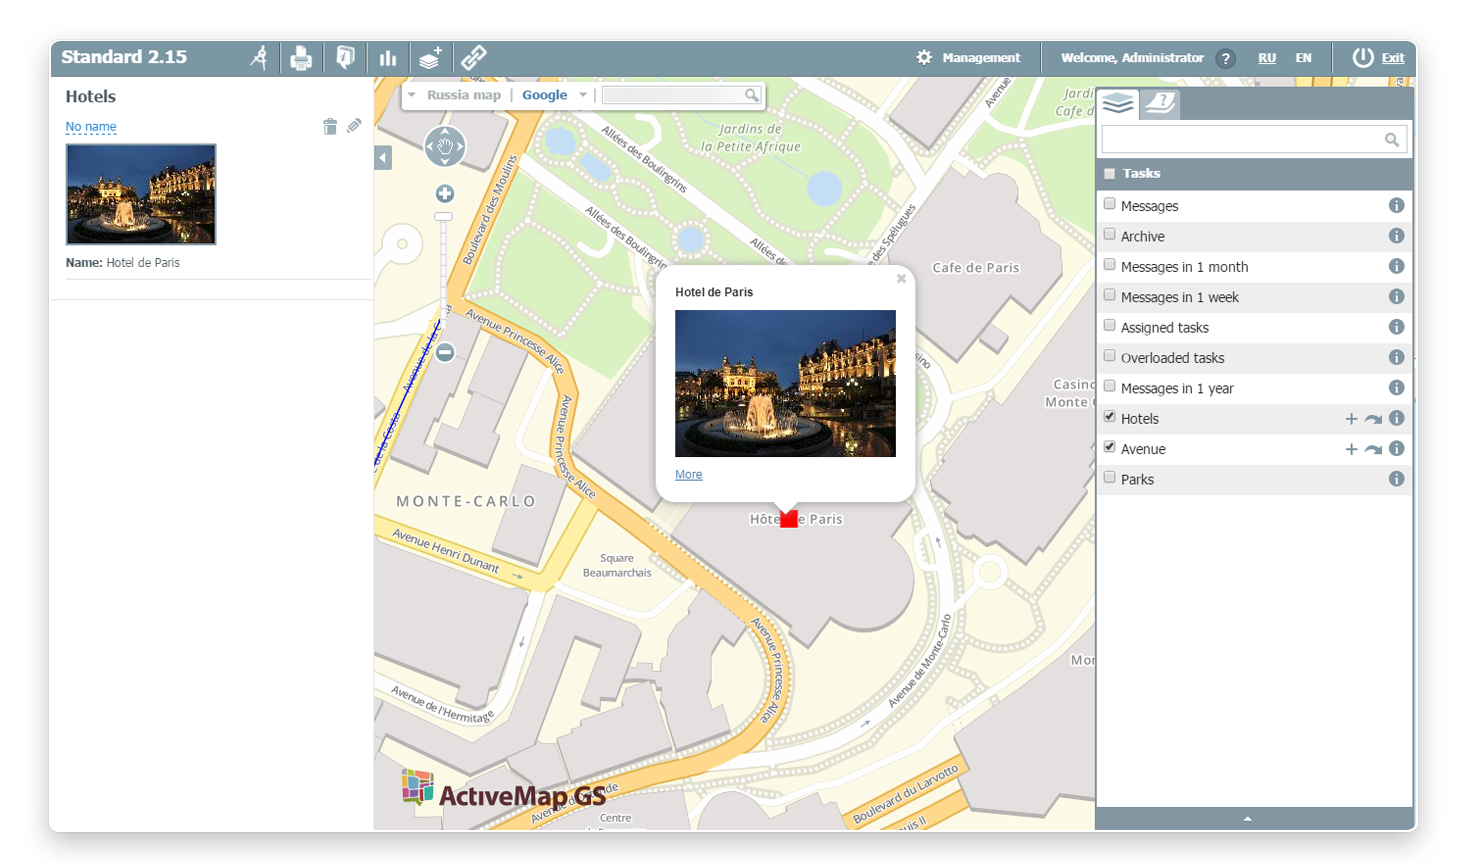
When selecting a certain object photograph, the user can open the zoomed-in view mode. Moreover, the user can click the link to see it in a separate pop-up window, as well as click a file to download it.
There are three buttons to the right of object names:

|
"Delete" The button deletes the selected object from a given layer. |
|---|---|

|
"Edit" The button is responsible for change of layer attribute values of the selected object and editing of attached photographs and files. |

|
"Highlight an area" The button is responsible for display of object boundaries on a map. |
